| Description |
| Receiver Messages |
| Data Acquisition |
| Receiver Script |
| Message Display |
| Channel Selection |
| Message Analysis |
| Error Handling |
Note: This manual applies to the Receiver Instrument bundled with LWDAQ 10.8.4+.
Note: The Receiver Instrument was formerly called the Recorder Instrument.
[12-MAR-26] The Receiver Instrument is available in the Instrument Menu of the LWDAQ program. The Receiver Instrument downloads signals from telemetry receivers so as to support data acquisition and recording by telemetry systems. The telemetry messages accumulated by any given telemetry receiver consist of a one-byte channel number, a two-byte sample value, a one-byte timestamp, and an optional payload. The payload is of fixed length for every message provided by a particular telemetry receiver, but varies from one type of telemetry receiver to the next. The table below lists the existing telemetry receivers. The main use of the Receiver Instrument is to act as a slave to the Neurorecorder, which uses the Receiver Instrument to download telemetry data and then writes that data to disk.
| Assembly | Name | Payload (Bytes) | Description |
|---|---|---|---|
| A3018 | Data Receiver | 0 | SCT receiver, single antenna input, discontinued, operates with LWDAQ Driver. |
| A3027 | Octal Data Receiver (ODR) | 0 | SCT receiver, eight antenna inputs, discontinued, operates with LWDAQ Driver. |
| A3032 | Animal Location Tracker (ALT) | 16 | SCT tracker, requires assistant receiver, obsolete, not supported, specify internet addres and driver socket for readout. |
| A3038 | Animal Location Tracker (ALT) | 16 | SCT receiver and tracker, in production, on-board channel selection, specify internet address for readout. |
| A3042 | Telemetry Control Box (TCB) | 16 | SCT receiver, in production, specify internet address for readout. |
A sequence of messages with the same channel number is a signal. Signals are generated by devices like Subcutaneous Transmitters (SCTs), Implantable Stimulators (ISS), and Implantable Inertial Sensors (IIS). These devices transmit their messages with microwaves that the telemetry receiver picks up with its antennas. The Receiver Instrument makes contact with the telemetry receiver over Ethernet. Some telemetry receivers provide a direct Power-over-Ethernet (PoE) connection, others require that we use a LWDAQ Driver as an intermediary between Ethernet and the receiver. We specify an internet protocol (IP ) sddress with daq_ip_addr. We specify a driver socket number, if required, with daq_driver_socket. When we press Reset and Configure and the Receiver Instrument connects to the telemetry receiver, determines its type and firmware version number. The receiver type allows the Receiver Instrument to set the payload automatically in payload_length. The payload, if it exists, will carry additional information that is synchronous with sample value and associated with the same channel number.
Example: The Animal Location Tracker (A3038) payload is sixteen bytes. The channel number and sample value are generated by an SCT over the tracker platform. The first fifteen payload bytes are the microwave power received from the SCT during its transmission by each of fifteen antenna coils arranged in a grid. The sixteenth byte is the power received by an auxiliary detector that may or may not be connected to an external antenna.
The Receiver Instrument plots the signals it downloads, but does not attempt to interpret the payload bytes. The sixteen-bit samples always represent a time-varying quantity, but the payload can represent any kind of information. The plot can be of three forms: simple, centered, and normalized, as we describe below.
The Reset and Configure button resets the telemetry receiver's data buffers and message clock. It reads a segment of data from the receiver, identifies the receiver type by examining this segment, and configures the Receiver Instrument accordingly. When we execute the reset, one or more lights should flash briefly on our telemetry receiver, depending upon its type.
The telemetry receiver keeps track of time by inserting clock messages into the message stream. The clock messages are those with channel number zero. In place of a signal value, they contain a sixteen-bit count of the clock message number. All existing telemetry receivers insert one clock message every 7.8125 ms, so the clock message frequency is 128 Hz. The clock message number starts at zero after reset, increments by one every 7.8125 s, reaches 65536 in 511.9921875 s, and returns to zero after exactly 512 s. The sixteen-bit clock message value, combined with a signal message's own eight-bit timestamp, allows us to determine the time of a sample with precision of 30 μs.
The Receiver Instrument acquires data in discrete blocks. It assembles these blocks in memory until it can compose an interval with exactly daq_num_clocks clock messages. With daq_num_clocks set to 128 and a telemetry receiver with a clock rate of 128-Hz, the interval will be exactly one second long. As soon as the Receiver Instrument has a complete interval, it plots the interval's signals in accordance with the plot controls and analysis_channels string.
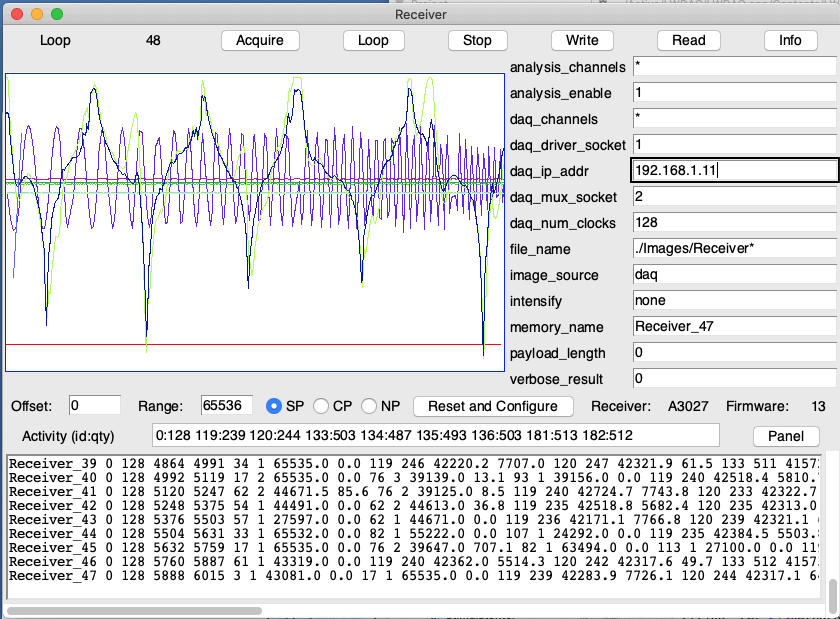
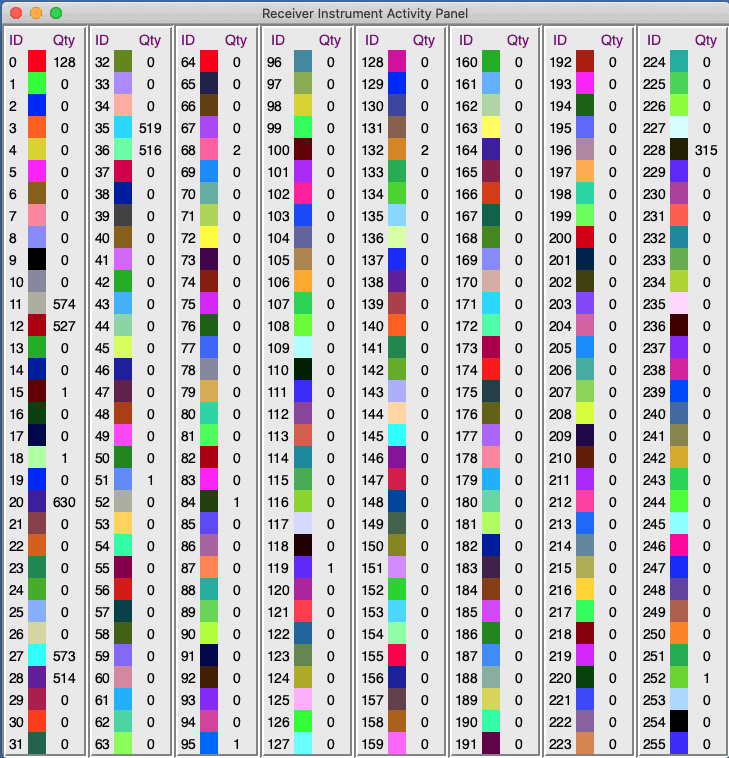
The Acquire button obtains one interval of data from the telemetry receiver. The Loop button obtains repeated intervals until you press Stop. We say the Receiver Instrument is looping. The data the Receiver Instrument acquires will be drawn in the Receiver Panel, but subsequently discarded when the next interval of data arrives. The Activity line lists all active channels, giving channel numbers and number of messages from each channel in the format c:a, where c is the channel number and a is the number of messages. Channel zero is always present, with daq_num_clocks messages. Other channels will be listed so long as they contain more than active_threshold messages. The active_threshold parameter is available in the Info panel. When there are many active channels, the activity string will be longer than its entry box. We can select the box and scroll along to the later entries. The Panel button opens a table of all possible telemetry channels, showing their plot colors and their number of samples, so we can view them all at the same time.
With analysis_enable = 1, the Receiver Instrument analyses each interval it acquires, plots the signals and generates a result string. With the same parameter set to zero, we see a gray-scale image of the message bytes, no plotting takes place, and no result string is generated. You can see an example of a result string in the screen shot above. To understand the meaning of numbers in the result string, set verbose_result to 1, and acquire an interval. You will get something like this:
Receiver_1
Channel Number: 1
Number of Samples Recorded: 512
Average Value: 43758.6
Standard Deviation: 117.9
The telemetry receiver receives messages from up to 255 channels. Our subcutaneous transmitters use channel numbers 1-223 for their signals, with the exception of those that have remainder zero or fifteen when divided by sixteen. Those with remainder fifteen we have reserved for auxiliary, slow data. Those with remainder zero we have reserved for no particular purpose. We control which channels the Receiver Instrument displays with analysis_channels . By default, this string is the wildcard character, "*", which selects all channels for which there are at least activity_threshold messages in the interval. Each channel receives four numbers in the result string. The first is the channel number, the second is the number of messages received from this channel, the third is the average value of the message samples, and the fourth is the standard deviation of the sample values. The numbers provided for clock messages are slightly different. Instead of the average and standard deviation, the Receiver Instrument provides the minimum and maximum clock values.
The messages in the telemetry receiver's message buffer are each four bytes long followed by a payload of dependent upon the telemetry receiver. The bytes of each message are listed in the table below. The Channel Number is used to identify the source of the message. Channel number zero is reserved for clock messages. Following the channel number, each message contains a sixteen-bit data word. In the case of SCTs, the sixteen-bit data word is a digitized voltage. The last byte of the message is a timestamp.
| Byte | Contents |
|---|---|
| 0 | Channel Number |
| 1 | Most Significant Data Byte |
| 2 | Least Significant Data Byte |
| 3 | Timestamp or Version Number |
| 4 to (L+3) | Payload Bytes |
All telemetry receivers have a clock. The clock is a twenty-four bit counter that counts clock ticks. The standard telemetry receiver clock runs at 32.768 kHz, and is provided by a ±1 ppm 32.768 kHz oscillator. The bottom eight bits of the counter provide the timestamp of individual non-clock messages. Every time the timestamp wraps around to zero again, which is every 256 ticks of the clock, the telemetry receiver stores a clock message in its message buffer. The timestamp of a clock message would always be zero, so the telemetry receiver stores a version number in the timestamp of clock messages, and this version number allows the Receiver Instrument to figure out what kind of telemetry receiver it is dealing with, and set its payload length. The upper sixteen bits of the clock message counter increment every time the telemetry receiver stores a clock message, and reset to zero every 512 s.
Note: The telemetry receiver will never store a message with channel number zero unless that message comes from the clock. All messages with channel number zero are guaranteed to be clocks.
The Receiver Instrument supports the use of auxiliary channels, which transmitting devices can use for acknowledgements or slow data. All channel numbers which, when divided by sixteen, have remainder fifteen, are auxiliary channel numbers. They are channel numbers 15, 31, 47, 63, 79, 95, 111, 127, 143, 159, 175, 191, 207, and 223. The aux_list_name parameter is the name of the string that contains a list of auxiliary messages. This list will include only the most recent aux_num_keep messages. Other processes waiting for data or acknowledgement can search the auxiliary message list for the messages they need. When they find such a message, they delete it from the list.
Each auxiliary message provides sixteen bits of content, in place of the usual sample value of a telemetry message. The Receiver Instrument assumes these sixteen bits are arranged as a four-bit identifier, a four-bit field address, and an eight-bit data byte. The four-bit identifier, combined with the auxiliary channel number, allow us to construct an eight-bit channel number that should match the lower eight bits of any unique identifier carried by the device that transmitted the auxiliary message. The field address tells us what kind of information the message is carrying, and the data byte carries the information itself. Each entry in the Receiver Instruments's auxiliary message list contains four unsigned integers: the deduced channel number, the field address, the data byte, and a timestamp. The timestamp is the telemetry receiver time at which the auxiliary message was received. Its units are clock ticks. The timestamp allows other processes to use the precise timing of auxiliary messages as a way to associate auxiliary messages with one another, and so combine multiple auxiliary messages together. The Receiver Instrument provides the timestamp modulo 216, which allows us to use timestamps to associated multiple messages from the same source.
Example: An Implantable Stimulator-Transponder (A3041) uses auxiliary messages to announce its receipt of commands, its completion of stimuli, and to convey its battery voltage. It transmits pairs of auxiliary messages, one immediately following the other, so that their timestamps upon receipt differ by no more than one tick. For the auxiliary message identifier we use the lower four bits of the IST's sixteen-bit identifier.
[27-SEP-23] To acquire fresh data from a telemetry receiver, you must set up a LWDAQ (Long-Wire Data Acquisition) system with a telemetry receiver, and make it accessible to your computer. We describe how to set up an LWDAQ in the LWDAQ User Manual. Once you have a LWDAQ available, consult the manual of your telemetry receiver for information on how to connect it to the LWDAQ. Chances are, all you have to do is plug it into one of the LWDAQ Driver sockets with a CAT-5 patch cable. The Receiver Instrument provides a set of lebeled text entry boxes on the right side of its window. Among these, you will see several that begin with daq_. We describe each of these in the table below. You change the value of the named parameters by entering new values in the text entry boxes.
| Parameter | Function |
|---|---|
| daq_ip_addr | IP address of LWDAQ driver |
| daq_driver_socket | driver socket number used for telemetry receiver |
| daq_mux_socket | multiplexer socket used for telemetry receiver (if any) |
| daq_num_clocks | number of clock messages to accumulate per acquisition |
| payload_length | number of payload bytes following message core |
| daq_channels | a list of channels for the receiver to select |
When you press the Acquire button, the Receiver Instrument obtains a new interval of messages from the telemetry receiver. In LWDAQ terminology, the Receiver Instrument acquires an image. This image contains exactly the number of clock messages you specify in daq_num_clocks. If you specify n, the first message in the image is clock message 0 the last message is the one that preceeds the n+1'th clock message. The next image the Receiver Instrument acquires will begin with this same n+1'th clock message, but in the next image this clock message will be clock message 0. The time it takes the telemetry receiver to generate daq_num_clocks clock messages is the image time. The image contains all messages stored by the telemetry receiver during the image time.
In order to assemble images with a specified number of clock messages, the Receiver Instrument reads blocks of messages out of the telemetry receiver and adds them to its own message buffer. When the message buffer contains enough clock messages, the Receiver Instrument extracts the desired interval from the message buffer and stores these messages in the new image. It leaves unused messages in the message buffer for inclusion in the next image. No messages are lost unless you leave the telemetry receiver too long and it's message buffer overflows, in which case the oldest messages are lost because they are over-written by new messages.
Example: We have an Octal Data Receiver (A3027) connected to a LWDAQ driver. Its eight Damped Loop Antennas (A3015C) are receiving signals from four Subcutaneous Transmitters (A3028B). Each SCT transmits 512 messages per second and occupies one channel number. The channel number is given by the second part of the SCT serial number, visible through its silicone encapsulation. The telemetry receiver stores 128 clock messages per second and all signal messages it receives. When we set daq_num_clocks to 128, the image period is one second. In this case, the image contains 128 clock messages. Assuming perfect reception, there will be 2048 transmitter messages. In practice, there will be fewer, and there may also be more, because the duplicate elimination the A3027 applies to its eight independent receivers is imperfect. The combined size of the ideal interval is 8704 bytes. We turn off all the transmitters and acquire again. We see the transmitter traces. We acquire again. They are still there. We are reading data that is several seconds old. We press Reset and Configure and acquire again. Now we see only a red trace. This red trace is the clock message trace. It has a slight slope to it.
Suppose your telemetry receiver is recording messages faster than the Receiver Instrument can read them out. Eventually, you will start to lose messages. The telemetry receiver's message buffer will overflow. When the buffer overflows, the telemetry receiver will over-write the oldest messages with the newest messages. The Receiver Instrument will recognise that the latest block of messages it downloads from the telemetry receiver does not match up with its message buffer. When the Receiver Instrument detects this or any other kind of error, it returns an error message instead of analysis results. If it has been looping, it stops looping.
Example: We turn on our four transmitters. Our Data Receiver (A3027) stores 8704 bytes per second. Our download speed drops to 4000 bytes per second because of some problem. After a hundred seconds, the receiver's 512 KB buffer is full. The buffer overflows. The Receiver Instrument detects a jump in the clock messages of the interval it is trying to compose, and returns an error message.
Set analysis_enable to zero and acquire again. The message traces disappear. All you see is a black image with some of the top rows filled in with random pixels. These pixels are your messages. They usually occupy only a small fraction of the display area, although they can overflow the image area when we are recording from a location tracker. Press the Info button. You will see another window with many more Receiver Instrument parameters (screen shot). Among them are daq_image_height and daq_image_width. These determine the size of the image that holds our messages. By default they are 300 and 400. The first row of the image we use for a header, so that leaves 119,600 bytes for messages, which is space for 29,000 messages.
Example: With four transmitters active, each transmitting 512 messages per second, we we obtain 2048 transmitter messages and 128 clock messages, making a total of 2176 messages of four bytes each, or 8704 bytes. The A3018's message buffer is 512 KBytes, so it will hold up to one minute of data for us. Because of this ample buffer in the telemetry receiver, our instantaneous TCP/IP download speed from the LWDAQ driver can drop to zero for ten or twenty seconds, and we will not lose any data. So long as our average download rate is around 8 Kbytes/s (64 kbits/s) or greater, we will sustain the data acquisition without loss. We use the Neurorecorder to store the data to disk, we will accumulate roughly 8 Kbytes/s, or 30 Mbytes/hr.
When you save a Receiver Instrument image to disk with the Write button, we recommend you give it the extension .daq. That way, LWDAQ will store the image in its DAQ format. The black part of the image following the actual messages will be left off the file. Only the header and the actual messages will be stored. But the Neurorecorder, uses the NDF format to store messages. As it acquires new messages, it appends them to the data section of an existing NDF file. When you read Receiver Instrument images from disk, the Receiver Instrument displays them as if they were freshly-acquired. But it changes the image_source parameter to "file". You will find the meaning of the image_source parameter and its values described here. Change image_source back to "daq" to acquire fresh data from the telemetry receiver.
If you press the Info button in the Receiver Panel, the Info Window opens with an array of Receiver parameters and their current values. These parameters are the elements of the LWDAQ_info_Receiver array. The Receiver uses these parameters to control data acquisition, analysis, and its own windows. Feel free to change them. The worst thing that can happen is the program freezes and you have to re-start it.
Press the Script button in the Info window and a text window will open up showing you the TCL script that defines the Receiver Instrument functions. All LWDAQ instruments define themselves with a few standard routines. In this case the standard routines are LWDAQ_daq_Receiver, and LWDAQ_analysis_Receiver. The former acquires a new image from the data acquisition system, the latter applies Receiver Instrument analysis to an image. The additional routin LWDAQ_create_controls_Receiver defines the Receiver Instrument's custom controls. These are the display entries and the reset button. The function of the reset button is defined by LWDAQ_reset_Receiver.
If you want to learn how, in detail, the Receiver Instrument communicates with the telemetry receiver device, look at the script for LWDAQ_daq_Receiver. You will see lines that open a socket to the LWDAQ driver over TCPIP, write to the command word on the telemetry receiver, and download blocks of data. The basic act of downloading data from the telemetry receiver into the LWDAQ driver's RAM, and then from the driver RAM to the LWDAQ software, is straightforward. What complicates the Receiver acquisition is the buffering required to parse the telemetry receiver message buffer contents into image periods, and to do so with minimal delay.
The Receiver Instrument is a generic downloader and sorter of sixteen-bit values stored in a generic telemetry receiver. Nowhere in the Receiver Instruments parameters will you see any mention of the telemetry receiver clock speed. Nor will you see any mention of the relationship between the sixteen-bit samples and any physical quantities. The sixteen-bit samples originate from some sort of sensor or transmitter. Consult the sensor or transmitter manual for the physical meaning of the sample values.
Example: The Subcutaneous Transmitter (A3028B) provides one analog input at 512 SPS. The gain in the analog input amplifiers is ×100, and the input range of its 16-bit ADC is 0 V to 2.7 V. Each ADC count is 2.7 / 65536 / 100 = 412 nV. For more details see the Analog Inputs of the A3028 manual.
There are three ways to plot the voltage in the Receiver Instrument window. The simple plot we select with the SP button. The range sets the range of the plot from bottom to top in ADC counts. The offset sets the voltage at the bottom of the display. The centered plot uses range in the same way, but ignores the offset. The plot of each signal is centered upon the window, so that the average value of the signal is exactly half-way up. The normalized plot ignores both range and offset and fits the signal exactly into the height of the display. The horizontal axis is time. The full range from left to right covers the recording interval. No matter what you do with the display, the data in the image is unaffected.
The message display uses a different color to display each channel. With analysis_channels set to its default value of * (which means "all messages"), the Receiver Instrument displays all messages in the current image (as we say in the previous section: in LWDAQ terminology, a block of messages assembled and returned by the Recoder Instrument is an image). The message display is the product of analysis of the image. Whether you display all the channels or not, they remain in the image. The Receiver Instrument will not delete them from the image.
Each channel number has its own color. The colors are unique, but it's unlikely that you could tell them apart if you had messages from all 256 possible channel numbers displayed at the same time. Subcutaneous transmitters use only 196 of the 256 available channels for their data transmissions. For a table of the channel numbers and colors, press the Panel button, or click here.
The horizontal axis of the display covers the image time. The Receiver Instrument does not know how to translate daq_num_clocks into image seconds, but it does know how to translate the clock messages and message time stamps into time in units of telemetry receiver clock ticks. So it plots the message values against the time, in clock ticks, at which the telemetry receiver stored the message. If there are missing messages, you will see a straight line joining the messages on either side of the missing messages.
[30-APR-26] Antenna array receivers like our Animal Location Trackers (ALT.php) permit us to specify a list of channels that the receiver will record from, while ignoring all other channels. The Receiver Instrument's daq_channels string allows us to specify such a list of channels for deployment in an ALT. Coaxial antenna receivers like the Telemetry Control Box (TCB) do not support channel selection in this way. By default, daq_channels is set to "*", which selects all channels. List the channels you want to the ALT to record from with a string of channel numbers seprated by spaces. When we Reset and Configure the Receiver Instrument sends the commands that configure channel selection to the telemetry receiver. The selection will either be ignored or honored. For telemetry receivers that ignore channel selection, the Receiver Instrument automatically sets them up to receive from all channels.
A second stage of channel selection takes place once the telemetry data reaches the Receiver Instrument. This second state is managed by the analysis_channels string. If this string is set to *, the Receiver Instrument analyzes and displays all channels in the image. If it is set to a list of channel numbers separated by spaces, only these channels are analyzed and displayed.
The result string returned by the Receiver Instrument changes with the value of analysis_channels. When you select all channels with *, every channel with one or more messages is listed in the line. When you select a specific subset of channels, only these channels, in order of ascending channel number, appear in the result string. At the end of this specific list of channels, the Receiver Instrument adds an entry for channel number −1, which is "all other non-zero channels", and gives you the number of messages in these other channels.
[14-APR-25] By default, the Receiver Instrument analyzes every new data image it acquires. The analysis consists of plotting, listing, and summarizing the acquired data. You can turn off analysis of the image by setting analysis_enable to zero. With the analysis turned off, you will see the bytes of the messages drawn as individual pixels in the top part of the image. When you enable the analysis, you get the message value plots. Set show_messages to a value greater than zero, and the Receiver Instrument will start to present raw message data in the text window, in a format we explain below.
The Receiver Instrument's image analysis routine is called LWDAQ_analysis_Receiver. This routine calls lwdaq_receiver, which in turn calls lwdaq_A3007_receiver. The lwdaq_sct_receiver routine is defined in a Pascal source filed called electronics.pas. If you want to learn about the analysis in detail, as a guide to writing your own reconstruction program, take a look at the Pascal file, where the algorithm is explained in detail in the comments. (Note: that lwdaq_sct_receiver was formerly called lwdaq_sct_recorder. The new name should be used in all code.)
The lwdaq_receiver command is available at the LWDAQ console. Its arguments are an image name and a command string. The command string begins with an instruction. The following table lists the lwdaq_receiver instructions.
| Instruction | Function | Used By Receiver |
|---|---|---|
| list | Lists active channels in an image. | Yes |
| Prints message contents and lists errors. | Yes | |
| plot | Plots messages in the image overlay and returns summary result. | Yes |
| clocks | Counts clock messages and locates specific clock messages. | Yes |
| extract | Extracts messages from a single channel. | No |
| reconstruct | Elminates bad messages and adds substitute messages. | No |
| purge | Removes duplicate messages. | No |
The Receiver uses the plot instruction to plot the channels in the image overlay and to generate the summary string. It uses the list instruction to obtain a list of active channels. Internally, as it is accumulating an image with the correct number of clock messages, the Receiver uses the clocks instruction to determine how many clock messages are in a new packet of data, and where the first and last clock messages are in the data. When the Receiver encounters errors in acquired data, it uses the plot instruction to obtain a list of these errors and their locations within the data, so that it can attempt to remove the errors and correct mis-alignment of message boundaries in the telemetry receiver. Such errors occur during rare electrical events such as static discharge on the data acquisition hardware or power interruptions. You can see for yourself how the Receiver uses the lwdaq_receiver instructions in the Receiver Instrument source code.
You can apply the lwdaq_receiver instructions yourself, using the console and the name of the current Receiver image. After you acquire a Receiver image, look at the value of memory_name. Suppose it's Receiver_1. Go to the File Menu and open the console. Enter the following at the console prompt.
(LWDAQ) 1 % lwdaq_receiver Receiver_1 "clocks"
0 128 3166
The result we show is the one we get when we apply a clock instruction to this image. There are 0 errors in the clock sequence in this image, there are 128 clock messages, and 3166 messages in total. Each message in an image has a message index, which is its position in the sequence of all messages. The first message has message index zero (0). Each message also has a channel index, which is its position in the sequence of messages in its channel. The following command returns the message index of each of three clock messages. The command specifies the clock messages by channel index.
(LWDAQ) 2 % lwdaq_receiver Receiver_1 "clocks 0 64 128"
0 128 3166 0 1583 -1
Clock message zero also has message index zero. The first message in the image is a clock message. Clock message 64 has message index 3166. There is no clock message 128, so the command returns −1 to indicate the absence of the specified clock message.
The print instruction instructs lwdaq_receiver to print out the messages for us, as shown below. Each message gets a separate line. On each line is the message index (the 0'th message is the first one in the image), the channel number, the data value, and the timestamp. After that comes the hexadecimal representation of the four bytes that make up the message in the block of data we acquired from the telemetry receiver.
(LWDAQ) 3 % lwdaq_receiver Receiver_1 "print 0 10"
Telemetry Receiver Version 5.
Total of 3166 messages and 128 clocks.
Encountered 0 errors in data block.
Messages 0 to 10 (index id value timestamp $hex):
    0   0  1281   5 $00050105
    1   5 42860   8 $05A76C08
    2   6 40972  18 $06A00C12
    3   9 40654  22 $099ECE16
    4   3 30275  33 $03764321
    5   7 37119  37 $0790FF25
    6   4 46759  60 $04B6A73C
    7   5 43183  72 $05A8AF48
    8   6 41065  73 $06A06949
    9   9 40063  87 $099C7F57
   10   3 30456  97 $0376F861
End of Messages
Here we see the print instruction used to print out the first eleven messages. If we don't specify the message range, the print instruction will print the contents of all the messages. The first message is a clock message. It's channel number is zero and its timestamp is 5. The timestamp of a clock message gives us the telemetry receiver version, which is in this case 5, meaning an A3018 with firmware 5. In the following print command, we see the messages and payload bytes produced by an Animal Location Tracker (ALT, A3032C, with firmware 9. The ALT produes sixteen payload bytes. In clock messages, the timestamp is the ALT version and the last payload byte is the telemetry receiver version. Here, the ALT version is 69, meaning A3032C with firmware 9, and the telemetry receiver version is 43, meaning A3037E with firmware 13. In all other messages, the payload consists of fifteen power measurements from the ALT detector coils and a reserved byte, which this version of the ALT sets to zero.
Telemetry Receiver Version 69.
Total 1132 messages, 128 clocks, 0 errors, and 0 null messages.
Messages 0 to 10 (index id value timestamp $hex):
    0   0 33266  69 $0081F245 1414141414141414141414141414142B
    1  39 40457   6 $279E0906 5C39656B7B681B737F5560645E676A00
    2 230 43263  64 $E6A8FF40 3E23464B432D597559374A4A51564000
    3  39 40440  67 $279DF843 5E38666C7D6920768156636860686E00
    4 230 43211 134 $E6A8CB86 4029493B422D5B7B573B4B4951584300
    5  39 40463 139 $279E0F8B 5834657179663E687F4E5B6659656300
    6 230 43221 188 $E6A8D5BC 3E22465043295771582C494C4F534100
    7  39 40463 198 $279E0FC6 57356470796543677E4E5B6657646300
    8   0 33267  69 $0081F345 1414141414141414141414141414142B
    9 230 43255   1 $E6A8F701 3F244853432858735A26494E4F543F00
   10  39 40458   6 $279E0A06 5D39656A7C681774805661655E676C00
End of Messages
We can invoke the print instruction automatically in the Receiver Instrument by setting show_messages to a value greater than zero. The Receiver Instrument will print show_messages raw messages to its text window on each acquisition. This raw message display is useful for diagnosing problems with telemetry receivers.
If you want to extract messages from a single channel, and get them in a format that's easy for plotting on the screen, or pasting into a spreadsheet, use the extract instruction. Here is an example, obtained from our Receiver_hum.daq data in image Receiver_1. We use the ellipsis ("...") to indicate lines we have cut from the console output.
(LWDAQ) 4 % lwdaq_receiver Receiver_1 "extract 1"
18 40972
73 41065
135 40923
208 40652
265 40586
...
32525 44508
32593 44287
32658 44226
32708 44208
The extract instruction takes one parameter: the channel number you want to extract from the image data. The extraction result does not contain the channel number. It returns the time and value of each message on a separate line. The time is in clock ticks since the start of the image interval. You can cut and paste the extraction result into a spreadsheet and plot the values that way, or you can use LWDAQ library routines to plot the same data in a LWDAQ window.
Each LWDAQ image provides an overlay in which you can draw graphs. The following lines use an extract instruction to obtain channel five (5), plot it in the overlay using lwdaq_graph, and refresh the display of Receiver_1 in the Receiver Instrument window using lwdaq_draw.
(LWDAQ) 5 % lwdaq_graph [lwdaq_receiver Receiver_1 "extract 5"] Receiver_1 -fill 1
(LWDAQ) 6 % lwdaq_draw Receiver_1 receiver_photo
The plot instruction plots messages in an image's overlay in the same as lwdaq_graph. Here we tell lwdaq_receiver to plot messages from channel three (3) and five (5) in the overlay.
(LWDAQ) 7 % lwdaq_receiver Receiver_1 "plot 0 65535 DC 3 5"
3 511 42461.0 3256.6 5 482 43415.2 522.4 -1 2045
(LWDAQ) 8 % lwdaq_draw Receiver_1 receiver_photo
The "0 65535" means that the display should show data values in the range 0 to 65535. The "DC" means that the coupling for the display should be direct. With "AC", the analysis will subtract the average of each channel's data value before it plots. The "3 5" means plot channels 3 and 5. If you say "*" instead of giving channel numbers, lwdaq_receiver will plot all available channels. In the results string we see that channel 3 provided 511 samples with average value 42461.0 and standard deviation 3256.6. Channel −1 is for "all other channels except channel zero". Channel zero (0) is, of course, the clock message channel. There were 2045 samples in the other channels.
The reconstruct instruction attempts to eliminate bad messages from the message stream and replace missing messages with substitute messages. The value of a substitute message will be the value of the previous message in the message stream. The reconstruct instruction's task is complicated by the fact that most sources of messages, such as the Subcutaneous Transmitter (A3028A) displace the instant of each individual message transmission by a random time. We call this random displacement transmission scatter. Transmission scatter makes it possible for two message sources with the same period to share the same transmission medium without corrupting a significant fraction of one another's messages. We discuss transmisison scatter in more detail in Collisions.
Example: Two Subcutaneous Transmitters (A3013A) share the same 900-MHz ISM radio-frequency band. Each A3013A transmission takes 7 μs. A 32.768 kHz clock runs in the transmitter. Every 64 clock ticks, the A3013A prepares to transmit a message. But it delays transmission by 0 to 15 clock ticks at random, which is what we call transmission scatter. The A3013A uses the lower four bits coming from its digital to analog converter as the random number. These bits being dominated by random noise, they make a good random number generator. When two A3013As drift into synchronicity, so that the 64-tick sampling periods begin within a few microseconds of one another, transmission scatter guarantees that only one in sixteen messages will be collide.
With transmission scatter, each message transmission occurs at some random time within a transmission window centered upon a nominal transmission time. The nominal transmission times, and therefore the transmission windows, are spaced by an exact and well-known transmission period.
A reconstruct instruction requires that we specify one message stream for reconstruction by giving its channel number. We specify the period of this message stream. The reconstruction deduces the transmission scatter from the period. The only units of time used by lwdaq_receiver instructions are data-receiver clock ticks. So we specify the period in units of clock ticks.
Example: A Subcutaneous Transmitter (A3013A) transmissions occur somewhere within 480 μs of the rising edge of its 512-Hz message clock. The distribution of the transmission time is random and uniform. The nominal transmission time is the center of this distribution, and is therefore 240 μs after the rising edge of the message clock. The transmission scatter is ±240 μs on either side of the nominal transmission time. The Data Receiver (A3018A) that receives our A3013A messages has a reference clock of 32.768 kHz. Each clock tick is 30 μs. The A3013A transmission scatter is therefore &plusm;240 / 30 = ±8 clock ticks. The A3013A's transmission frequency is 512 SPS, so its period is 64 clock ticks. The time between two consecutive messages could be as little as 48 ticks and as great as 80 ticks, or 1.5 ms to 2.4 ms. You can see transmission scatter between consecutive A3013A messages here.
Here is an example reconstruct command, applied to Receiver_hum.daq example image in Receiver_1.
(LWDAQ) 1 % lwdaq_receiver Receiver_1 "reconstruct 1 64 30000"
-7 30000
59 41175
121 44466
183 47057
246 46943
317 44541
380 40901
432 38665
498 39453
...
32693 38335
(LWDAQ) 2 %
We see the reconstruction of channel 1 with period 64 ticks. The third number in the command is the standing value, which we set to 30000. The standing value of the channel is the value we want the reconstruction to use if it determines that there is a missing message at the beginning of the image's message stream. In this case, the reconstruction finds that there is a transmission window overlapping the beginning of the image's time interval. The center of this transmission window is −7 clock ticks before the beginning of the images's time interval, and therefore overlaps this time interval because the transmission scatter is ±8 clock ticks. The reconstructed message stream contains a message at time −7 with value equal to the standing value we specified.
A reconstruct instruction allows us to apply reconstruction to a continuous message stream. Each time we call reconstruct we apply it to one image only, but we pass information to it from previous images using the command string. The standing value is the value of the final message from the previous image. The final message value in our example reconstruct result is 38335.
Suppose the reconstruction gets to the end of a message stream in an image and finds that the final transmission window overlaps the end of the image time. This happens in our example above. The final transmission window is centered at time 32761 clock ticks. Our extraction returned a final message "32765 38205", which lies in this window. Our reconstruct instruction does not return this final sample. This final sample belongs to a sample window that overlaps the end of the playback interval. There will be another such window overlapping the beginning of the same playback interval. Reconstruction generates a sample for that first window, so we must not generate a sample for the final window, or else we will return one too many samples for the interval.
The extract and reconstruct instructions both use the image results string to store meta-data. The image results string is part of the image data block, as described here. The extract instruction sets the image results string to the number of clocks in the image followed by the number of messages extracted from the selected channel. The reconstruction writes four or more numbers to the image results string.
(LWDAQ) 2 % lwdaq_image_results Receiver_1
128 512 4 5 38335
The lwdaq_image_results command returns an image's results string. We obtain the above result if we call lwdaq_image_results immediately after our execution of a reconstruct instruction. The first number is the number of clocks in the image. Then comes the number of messages in the reconstructed message stream. The third number is the number of messages the reconstruction rejected as bad messages. In this case, it rejected 4. The fourth number is the number of missing messages for which the reconstruction generated substitutes. In this case, it inserted 5 substitute messages. The final number is the "standing value" of the signal, which is the most recent, reliable sample value.
We pass the standing value to the next reconstruction by appending like this:
(LWDAQ) 1 % lwdaq_receiver Receiver_2 "reconstruct 1 64 38335"
Here we assume that the name of the next image, one it has been acquired, is Receiver_2. We specify 38335 for the standing value because that was the value of the last message returned by reconstruction when it operated upon Receiver_1.
In our first reconstruct instruction, we did not pass the correct standing value. That's why we ended up with the "−7 30000" sample, which the reconstruction inserted by looking at the samples later in the interval. The extract and reconstruct instructions create a list of samples and their payloads for subsequent use by routines such as lwdaq_locator command. The locator command takes the payload and extracts from it coil power measurements which it uses to measure the location of a subcutaneous transmitter on a tracker platform.
The purge instruction is the only instruction that alters the data downloaded from the telemetry receiver. The instruction eliminates duplicate messages. The Octal Data Receiver (A3027) and Telemetry Control Box (A3042) generate duplicate messages because they have multiple, independent detectors receiving the same samples at the same time. The Animal Location Tracker (A3038) generates no duplicates because its antennas all act together to receive each sample. Most duplicates are eliminated by the receiver itself, prior to download, but some persist. The lwdaq_receiver routine identifies duplicates prior to analysis and subsequently ignores them. The purge instruction performs no analysis. Instead, purge over-writes the original data with the duplicates removed and returns the number of unique messages. The data we downaload from a heavily-used Telemetry Control Box can contain up to fifty percent duplicates. The Receiver Instrument sets its purge_duplicates flag when downloading from telemetry receivers that tend to generate duplicates, but clears the flag for receivers that do not generate duplicates.
The SCT telemetry protocol reserves all channel numbers for which the lower four bits are ones (0xF) for auxiliary messages. Set the show_aux_messages flag to have the Receiver print out auxiliary messages. For mnore about auxiliary messagesa, see Message Encoding.
[21-APR-25] Static discharge, electrical power glitches, interruption of TCPIP communication, and conflict between different LWDAQ processes trying to access a telemetry receiver will all corrupt the data obtained by the Receiver Instrument. When the Receiver Instrument detects an error in the data it has downloaded, it makes no attempt to correct the error. The only reliable way to handle an error in the data stream is to reset the telemetry receiver and try again. By default, the Receiver Instrument does not reset its telemetry receiver when it encounters an error. When it is looping, the Receiver will reset the telemetry receiver and attempt to continue acquiring only if the loop_on_error flag is set. By default, this flag is cleared. We can configure the Receiver Instrument to reset the telemetry receiver by setting this flag. Now, when it is looping, it will reset and try to continue looping. But if we also try to record from the same telemetry receiver with a Neurorecorder, both our Receiver Instrument and the Neurorecroder will be resetting the telemetry receiver repeatedly. Neither process will be able to obtain a complete and continuous data stream from the receiver, so they will both try to fix this problem by resetting the telemetry receiver. By default, therefore, loop_on_error is cleared, so that other, more vital processes, such as Neurorecorders, can use LWDAQ_reset_Receiver to reset the telemetry receiver and attempt to proceed with data acquisition.
The show_errors parameter instructs the Receiver Instrument to print out a table of raw messages when it encounters an error. If show_errors is greater than zero, the Receiver will print out show_errors messages before and after the first error encountered in a block of data downloaded from the receiver. The print-out will include a description of the error, and the corruption of the data will be visible in the hexadecimal printout of the raw message contents. The show_messages instructs the Receiver Instrument to print out show_messages raw messages regardless of whether or not an error occurs. In the case of show_messages, however, the block of messages begins at the start of the acquired interval, while the show_errors function selects the first error encountered for display.