Disclaimer: These protocols serve as a general guide. Surgical and animal welfare requirements vary across institutions. Always consult your institution's veterinary staff to ensure compliance with local guidelines.
Purpose: This protocol describes the surgical implantation of a subcutaneous transmitter (SCT) for chronic recordings of rodent EEG, EMG, or both. It incorporates techniques and observations from multiple labs to improve transmitter placement electrode wire positioning.
page-chunkmatch-prompts-onlySCT Implantation Protocol with EMGWhat is the procedure for implanting an SCTT?How do I record EMG with an SCT
Sterilize all devices in 70% or 100% ethanol for at least 10 minutes prior to implantation. Do not surpass 1 hour in ethanol to avoid dissolution of silicone.
Prepare the subcutaneous transmitter (SCT):
Confirm device channel number and proper functionality before sterilization.
Make a general estimate as to how long your leads should be. You can measure one of your mice from the middle of its bak to the top of its head, and add length for wiggle room. If your leads are too long it could irritate the animal, if they're too short, they tension could disrupt the electrodes or result in the transitter being pulled forward too far.
Connect depth electrodes or stimulators before sterilization.
Refer to the appropriate SCT manual to ensure you know the purpose and identity of each lead.
Sterilize components separately; you will connect electrodes post-transmitter implantation.
Prepare the EMG lead and electrode:
Ensure the EMG leads, which are connected to the SCT, have 3-4 mm of exposed coiled wire at their terminus. You can strip additional silicone from the lead if necessary (see our lead stripping video for guidance).
Confirm that the exposed coiled wires can pass through the selected syringe needles.
3. Animal Preparation and Anesthetization
Weigh the animal.
Select an appropriate animal weight based on the transmitter model. Transmitter weight dictates the minimum allowable animal weight.
For example, the A3049J2S (a 0.2-80Hz, two-channel transmitter intented for sleep studies) weighs 2.7g. Animals must weigh at least 20g at the time of implantation for this model.
Induce anesthesia per institutional guidelines (e.g., 3-4% isoflurane). Use the toe-pinch method to verify proper anesthetization. Administer pain medications (consult your institutional guidelines for guidance on pain medication protocols).
Apply eye lubricant throughout the procedure.
Shave and disinfect the scalp and back area (if implanting the transmitter via the Back Incision Method).
Place the animal on a heating pad or temperature-controlled surgical platform.
Secure the animal in a stereotaxic frame if EEG depth electrodes are to be implanted.
4. Head Incision and Sterilization
Using forceps and scissors, lift the scalp and remove an oval section of skin to expose the top of the skull. Avoid the eyes.
For EMG recordings:
Extend the head incision a few millimeters beyond the skull to expose the trapezius muscles on the neck. Do not make a second incision-simply extend the original incision.
Expose both trapezius muscles, as the electrode will be implanted through both.
Clean the skull surface thoroughly using a bone scrapper to remove the connective tissue.
Optional: apply diluted hydrogen peroxide (6% v/v) to the skull and immediately dry it. This highlights any remaining connective tissue on the surface of the skull that can be removed using a bone scrapper.
5. Transmitter Insertion
Head Incision Method
Note: This method involves inserting the transmitter through the head incision and tunneling it down to the back. Therefore, this method is only recommended for our A3048-family SCTs, or the slim versions of the A3049-family SCTs, all of which have side-mounted batteries.
How do I insert a Subcutaneous Transmitter into an animal? Where do I place a Subcutaneous Transmitter?
Lift the skin at the back of the head incision.
Next, you are going to create a tunnel for the leads to pass through that allows the transmitter to sit in the back of the animal. To prevent irritation in the animals neck, we advise making the tunnel along the back of the animal, up until the neck, and then bringing the tunnel around the side of the neck (rather than directly over the spine) and through the head incision at a bit of an angle.
Use forceps to create a tunnel under the skin and above the muscle from the head incision to where the transmitter will lay, about half way around the back, in the mid-dorsal region. To create the tunnel you will clear away connective tissue that connects the muscle and the skin. The tunnel should be about as wide as the transmitter you are inserting.
Gently insert the transmitter, guiding it down the spine to about half way down the back.
Ensure the transmitter stays centered over the spine to avoid displacement.
Back Incision Method
How do I insert a Subcutaneous Transmitter into an animal? Where do I place a Subcutaneous Transmitter?
Use tweezers to pinch and cut skin of mid-dorsal region, half way down the back. Incision must be large enough for the transmitter to fit through.
Make a pocket for the transmitter to sit in:
Clear connective tissue between skin and muscle where transmitter should lay. There are different schools of thought on where the transmitter should lay. We want to avoid the transmitter directly settling on the spine and also do not want it to fall to the front of the animal, as it will be able to claw it out. Be cautious of making too large of a pocket inbetween the skin and the muscle to prevent the transmitter from moving too much after placement.
Next, you are going to create a tunnel for the leads to pass through that allows the transmitter to sit in the back of the animal. To prevent irritation in the animals neck, we advise making the tunnel along the back of the animal, up until the neck, and then bringing the tunnel around the side of the neck (rather than directly over the spine) and through the head incision at a bit of an angle.
Place transmitter in the pocket you created under the skin in the back.
Feed electrode leads up the back tunnel and pull through the head incision with tweezers.
Make sure leads are out of the way when drilling in next steps
6. Burr Hole Mapping and Drilling
Glue the skin of the scalp in place with Vetbond to prevent bleeding and keep skin retracted for surgery.
Zero the stereotaxic stand using bregma.
Using your stereotaxic apparatus, locate the desired burr hole coordinates, and mark them on the skull with a sterilized marker.
Carefully drill burr holes at marked positions. Stop until there is a thin layer of bone covering the dura. Use a sterile syringe needle or tweezers to pock through to the dura.
If using set screws to anchor electrodes, confirm their fit in the burr holes.
Dab excess fluid with sterile cotton.
7. EEG Electrode Placement
If you used Back Incision Method to insert your transmitter, you will connect and prepare your electrodes now, before inserting them into the brain. See our Electrode Surgery Protocol for detailed descriptions of connection and insertion methods for our different electrodes.
Insert electrodes into burr holes-surface electrodes first, then depth electrodes. For more information on inserting our different types of electrodes, see our Electrode Implantation Protocol.
If bleeding occurs, dab with a cotton bud/Q-tip.
Optional: apply Vetbond around burrholes (avoid brain contact).
Pull excess leads back into the tunnel. As little wire should be exposed through the scalp incision as possible. Make sure to leave slack in the leads under the skin. If the leads are pulled too tight between the trasnmitter and the electrodes, they can irritate the animal or cause dislodging of device parts.
Secure the leads in place where they exit the head incision with a bit of Vetbond.
8. EMG Electrode Placement
Figure: Surgical diagram demonstrating the surgical insertion of EMG leads into the neck of a rodent. In this diagram, the syringe needle use to create one of the tunnels in the musle is still in place, with an EMG lead threaded through the needle. Note the direction of the syringe needle in relation to the lead.
Identify the top of the trapezius muscles at the base of the skull and locate the midline between them.
You will implant to EMG electrode into the neck. The green and yellow leads. The procedure for implanting and securing the EMG electrode is the same for both leads.
Use a pointed syringe needle to two ~2 mm horizontal tunnels through the trapezius muscles, try to go through both muscles. Begin the insertion on the side of the neck opposite the EMG lead, so that the hub (base) of the syringe needle is on the side of the neck furthest from the lead connection on the EIF, also known as the "exit" of the tunnel. This orientation allows you to remove the needle later by gripping the hub while holding the wire in place.
The needle does not need to go more then a few mm deep into the muscle. It must go deep enough that it can not easily be ripped out of the skin. The needle should create a "tunnel", meaning it should have both and entrance and an exit into the muscle.
Control bleeding with sterile cotton if needed.
Leave the needle in place.
With the syringe still in the muscle, insert the stripped coiled wire (e.g., lead with P
-Coil terminus) of your EMG lead through end of the needle. Thread the wire through until it exits from the other end of the muscle tunnel, leaving 1-2mm exposed and on top of the muscle.
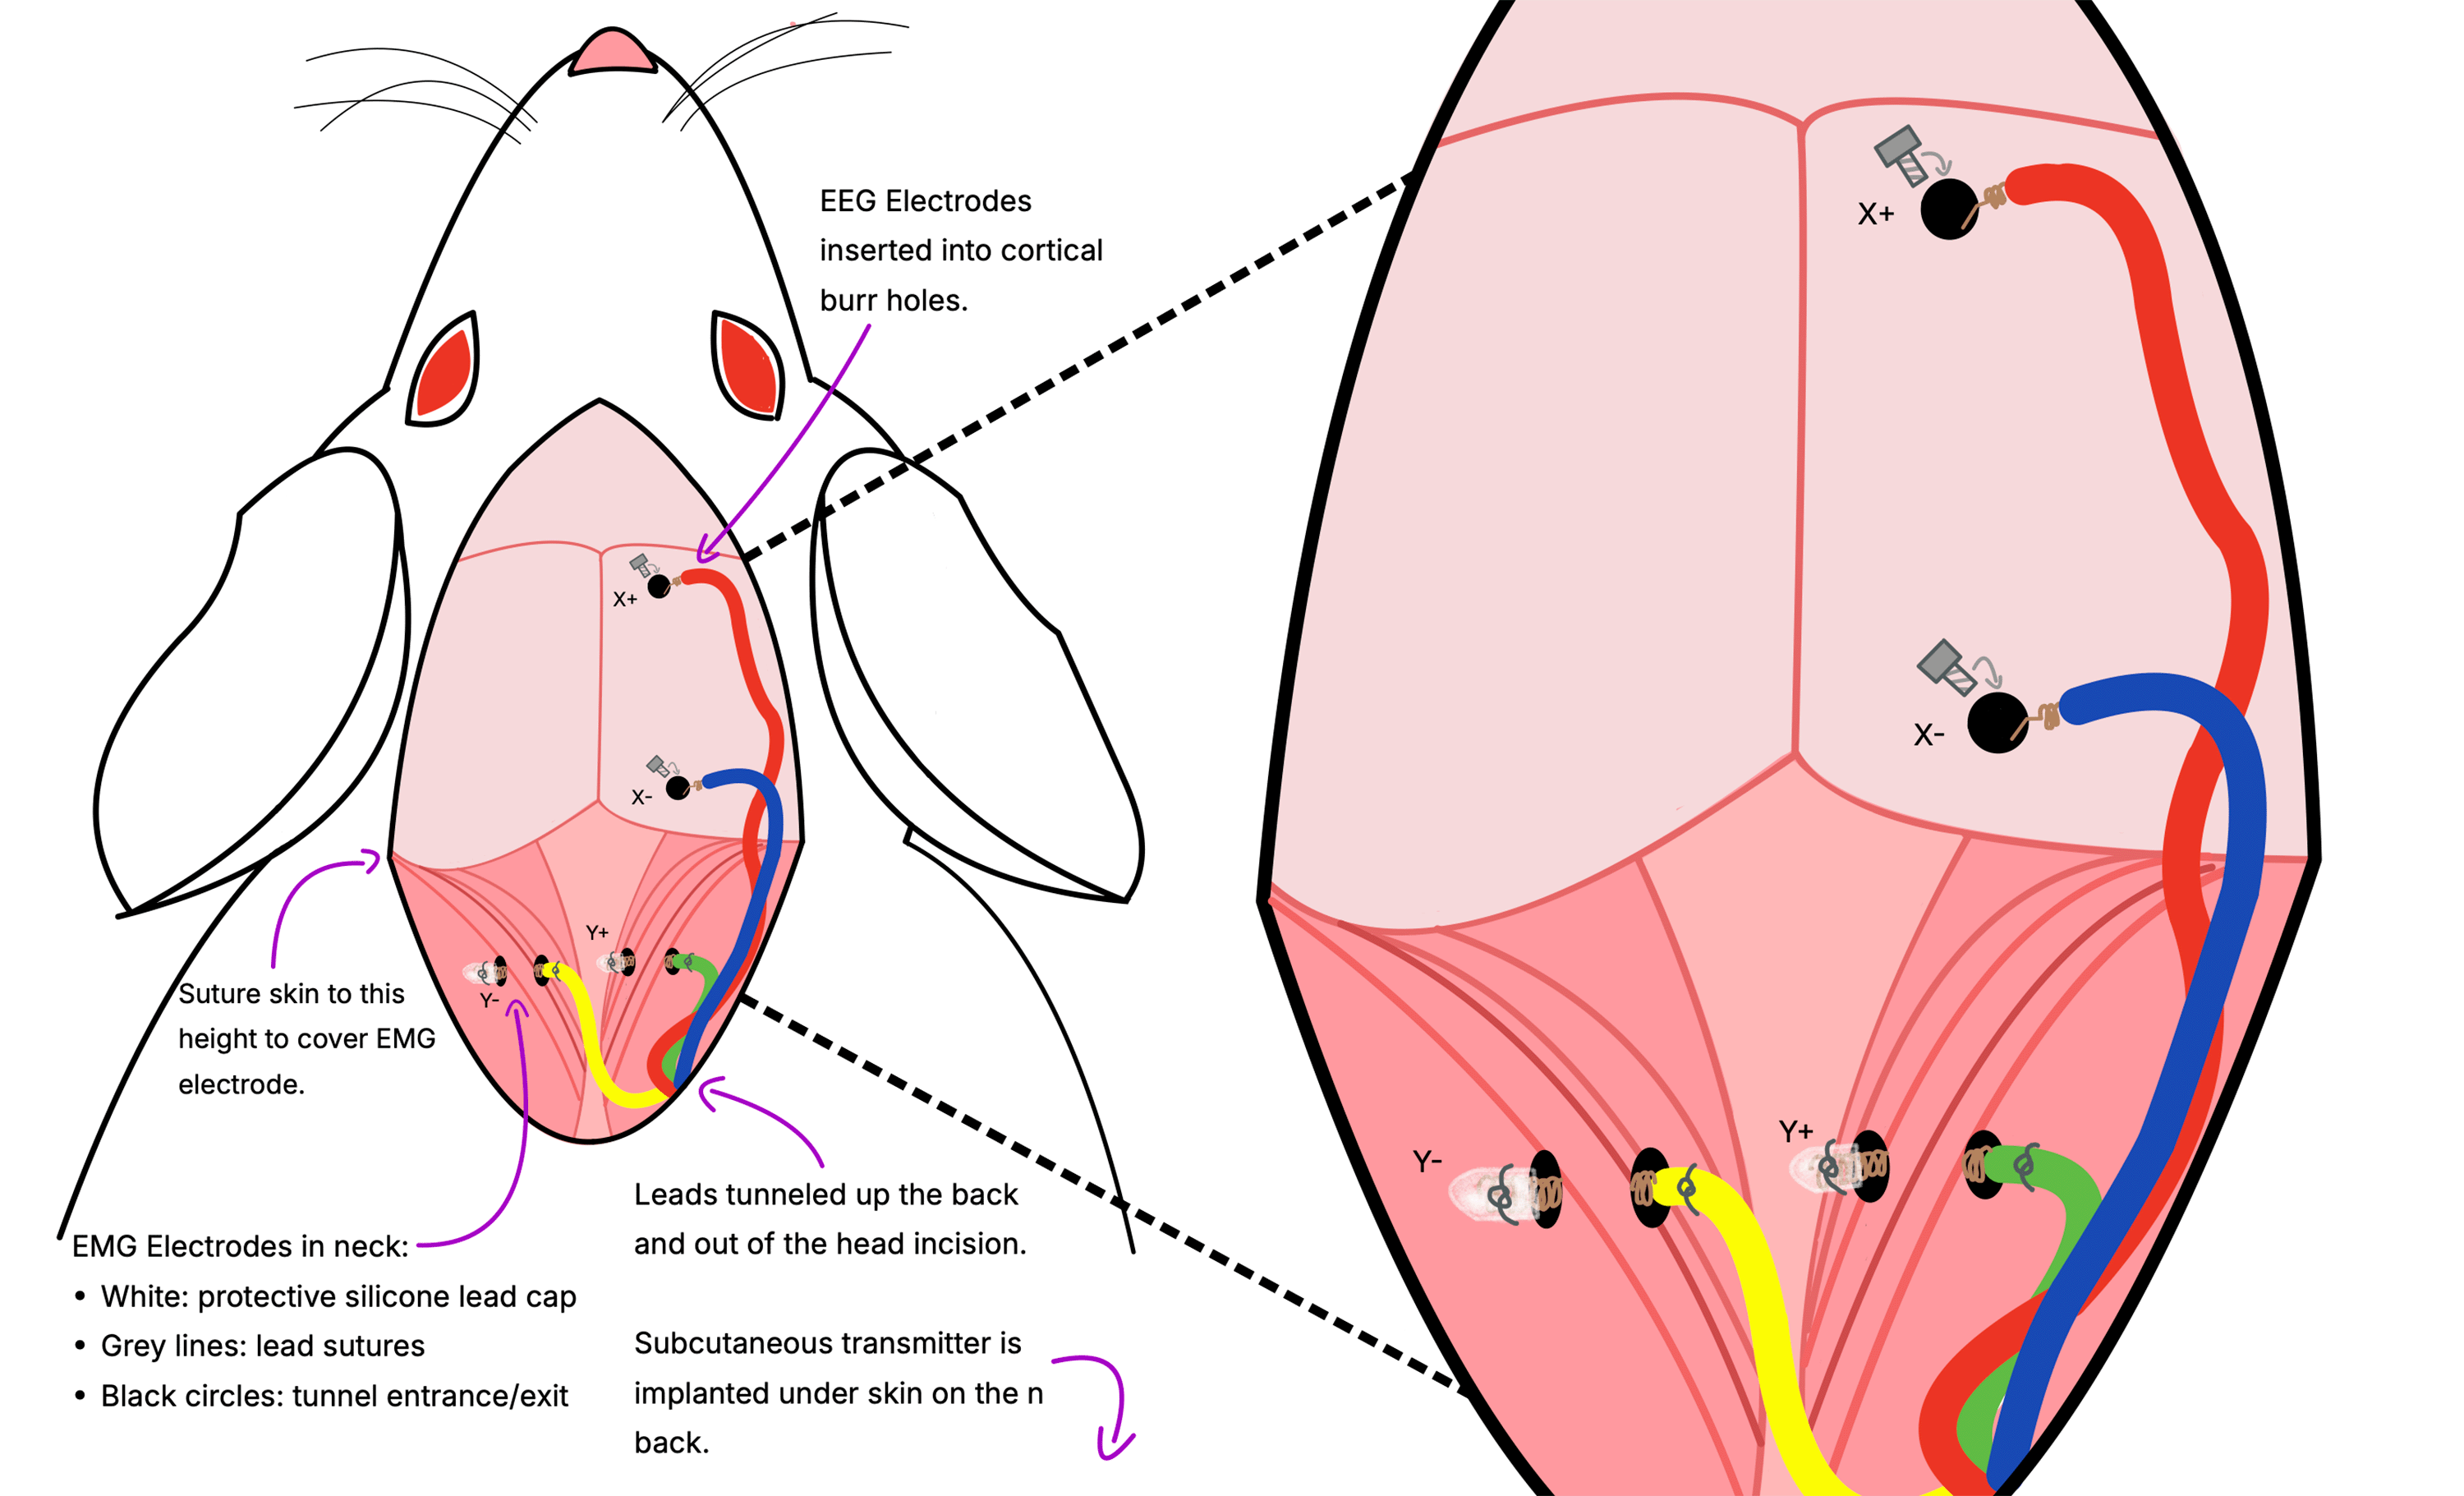
9. Securing the EMG Electrodes
Figure: Surgical diagram demonstrating the securement of EMG leads inthe neck of a rodent. In this diagram, you can see the electrode caps place on the exposed wire that exits the tunnel through the muscle. The cap is secured either by and additional suture over the cap, or with Kwik Cast (either in the cap or over the cap and lead).
Ensure 1-2 mm of the bare wire protrudes from the muscle on the exit side before removing the needle.
Carefully remove the needle while keeping the wire in position. It is helpful to have the wire extend past the end of the needle a small amount, so you can grip it with tweezers while removing the needle.
Once the needle is removed, use tweezers to attach the OSI-provided wire cap to the exposed end of the wire at the exit of the tunnel. The wire cap should cover all of the exposed coiled wire that sits on the muscle. The purpose of the cap is to insulate the exposed electrode wire, reducing the risk of artifacts in the EMG signal.
Options for securing the leadcap:
Suture: Place a suture over each capped wire, at the exit of the tunnel, to anchor it in the muscle and hold the cap in place on the exposed wire.
Kwik-Cast: Use a small amount of Kwik-Cast sealant to secure the cap. You can either place a small amount of Kwik-Cast into the cap before placing it on the lead, or you can cover the cap with Kwiq-Cast once it is placed on the lead. Be careful not to allow any Kwik-Cast sealant to drip into the muscle tunnel.
Suture the subcutaneous leads at the muscle entry point to prevent movement of the implanted wire.
Optional: Apply a small amount of dental cement to the portion of the lead before it enters the muscle to reduce movement under the skin. Avoid excess cement, which may restrict neck mobility.
10. Cementing and Closing
Closing the head incision:
You will create a dental cement cap to secure the implants on the animals head.
Secure burr holes in place with a bit of dental cement; allow curing.
Clip protruding depth electrode posts at designed breakpoints.
Cover over all exposed areas, metal, and leads with more cement, avoiding too much contact with the the animals fur and skin. The top of the dental cement may remain a bit tacky due to oxidation, it is fine to cover it with more dental cement anyway.
Allow cement to fully cure and trim excess.
Seal cement-skin interface with small amount of Vetbond. Avoid eyes and fur.
Closing the back incision (if applicable):
Suture closed the back incision.
Take care to ensure the transmitter is not sitting directly under the incision and that the leads are not damaged or caught in the sutures.
EMG electrode and lead:
Ensure the electrode is secure and all adhesives are fully cured.
Verify there is some slack in the EMG lead to accommodate head and neck movement during recovery.
Close the incision over the EMG site by suturing the skin up to the base of the skull. While you can use dental cement to secure the EMG electrode implantation, dental cement on the neck can restrict the animals movement.
11. Post-Surgical Care
Allow several days of recovery in a clean, quiet environment.
Monitor daily for:
Pain
Distress
Weight loss
Infection
Consult your institutaion for protocols on antibiotic treatments and wound care.
If the dental cement cap on the head becomes displaced, or if electrodes wired are exposed at all, please consult your vet as the animal will likely need to be culled.
Notes and Best Practices
When using an SCT, it's best to make a clean cut and re-strip the silicone at the end of the lead before reuse. See our lead stripping video for help.
When using cyanoacrylate, avoid filling burr holes entirely with glue-especially important when implanting depth electrodes, which don't fully occupy the hole.
Document electrode placements and orientations meticulously.
Ensure tunnels are just wide enough to prevent device migration.
Label each SCT with animal ID and date of implantation.
Some of our customers report the transmitter adhering to the underside of the skin of the animal's back. If you notice the animal is not grooming where the transmitter is and the skin seems thin or stiff, move the transmitter around a bit with your fingers to detach it from the skin and then apply sudocream. Our customers report that our slim A3048-family SCTs never adhere to the skin of the animal.
You can co-house animals witht Subcutaneous Transmitter implants, but we advise letting the animals heal on their own for a few days before co-housing them.
 SCT Surgery Protocol, EEG and EMG
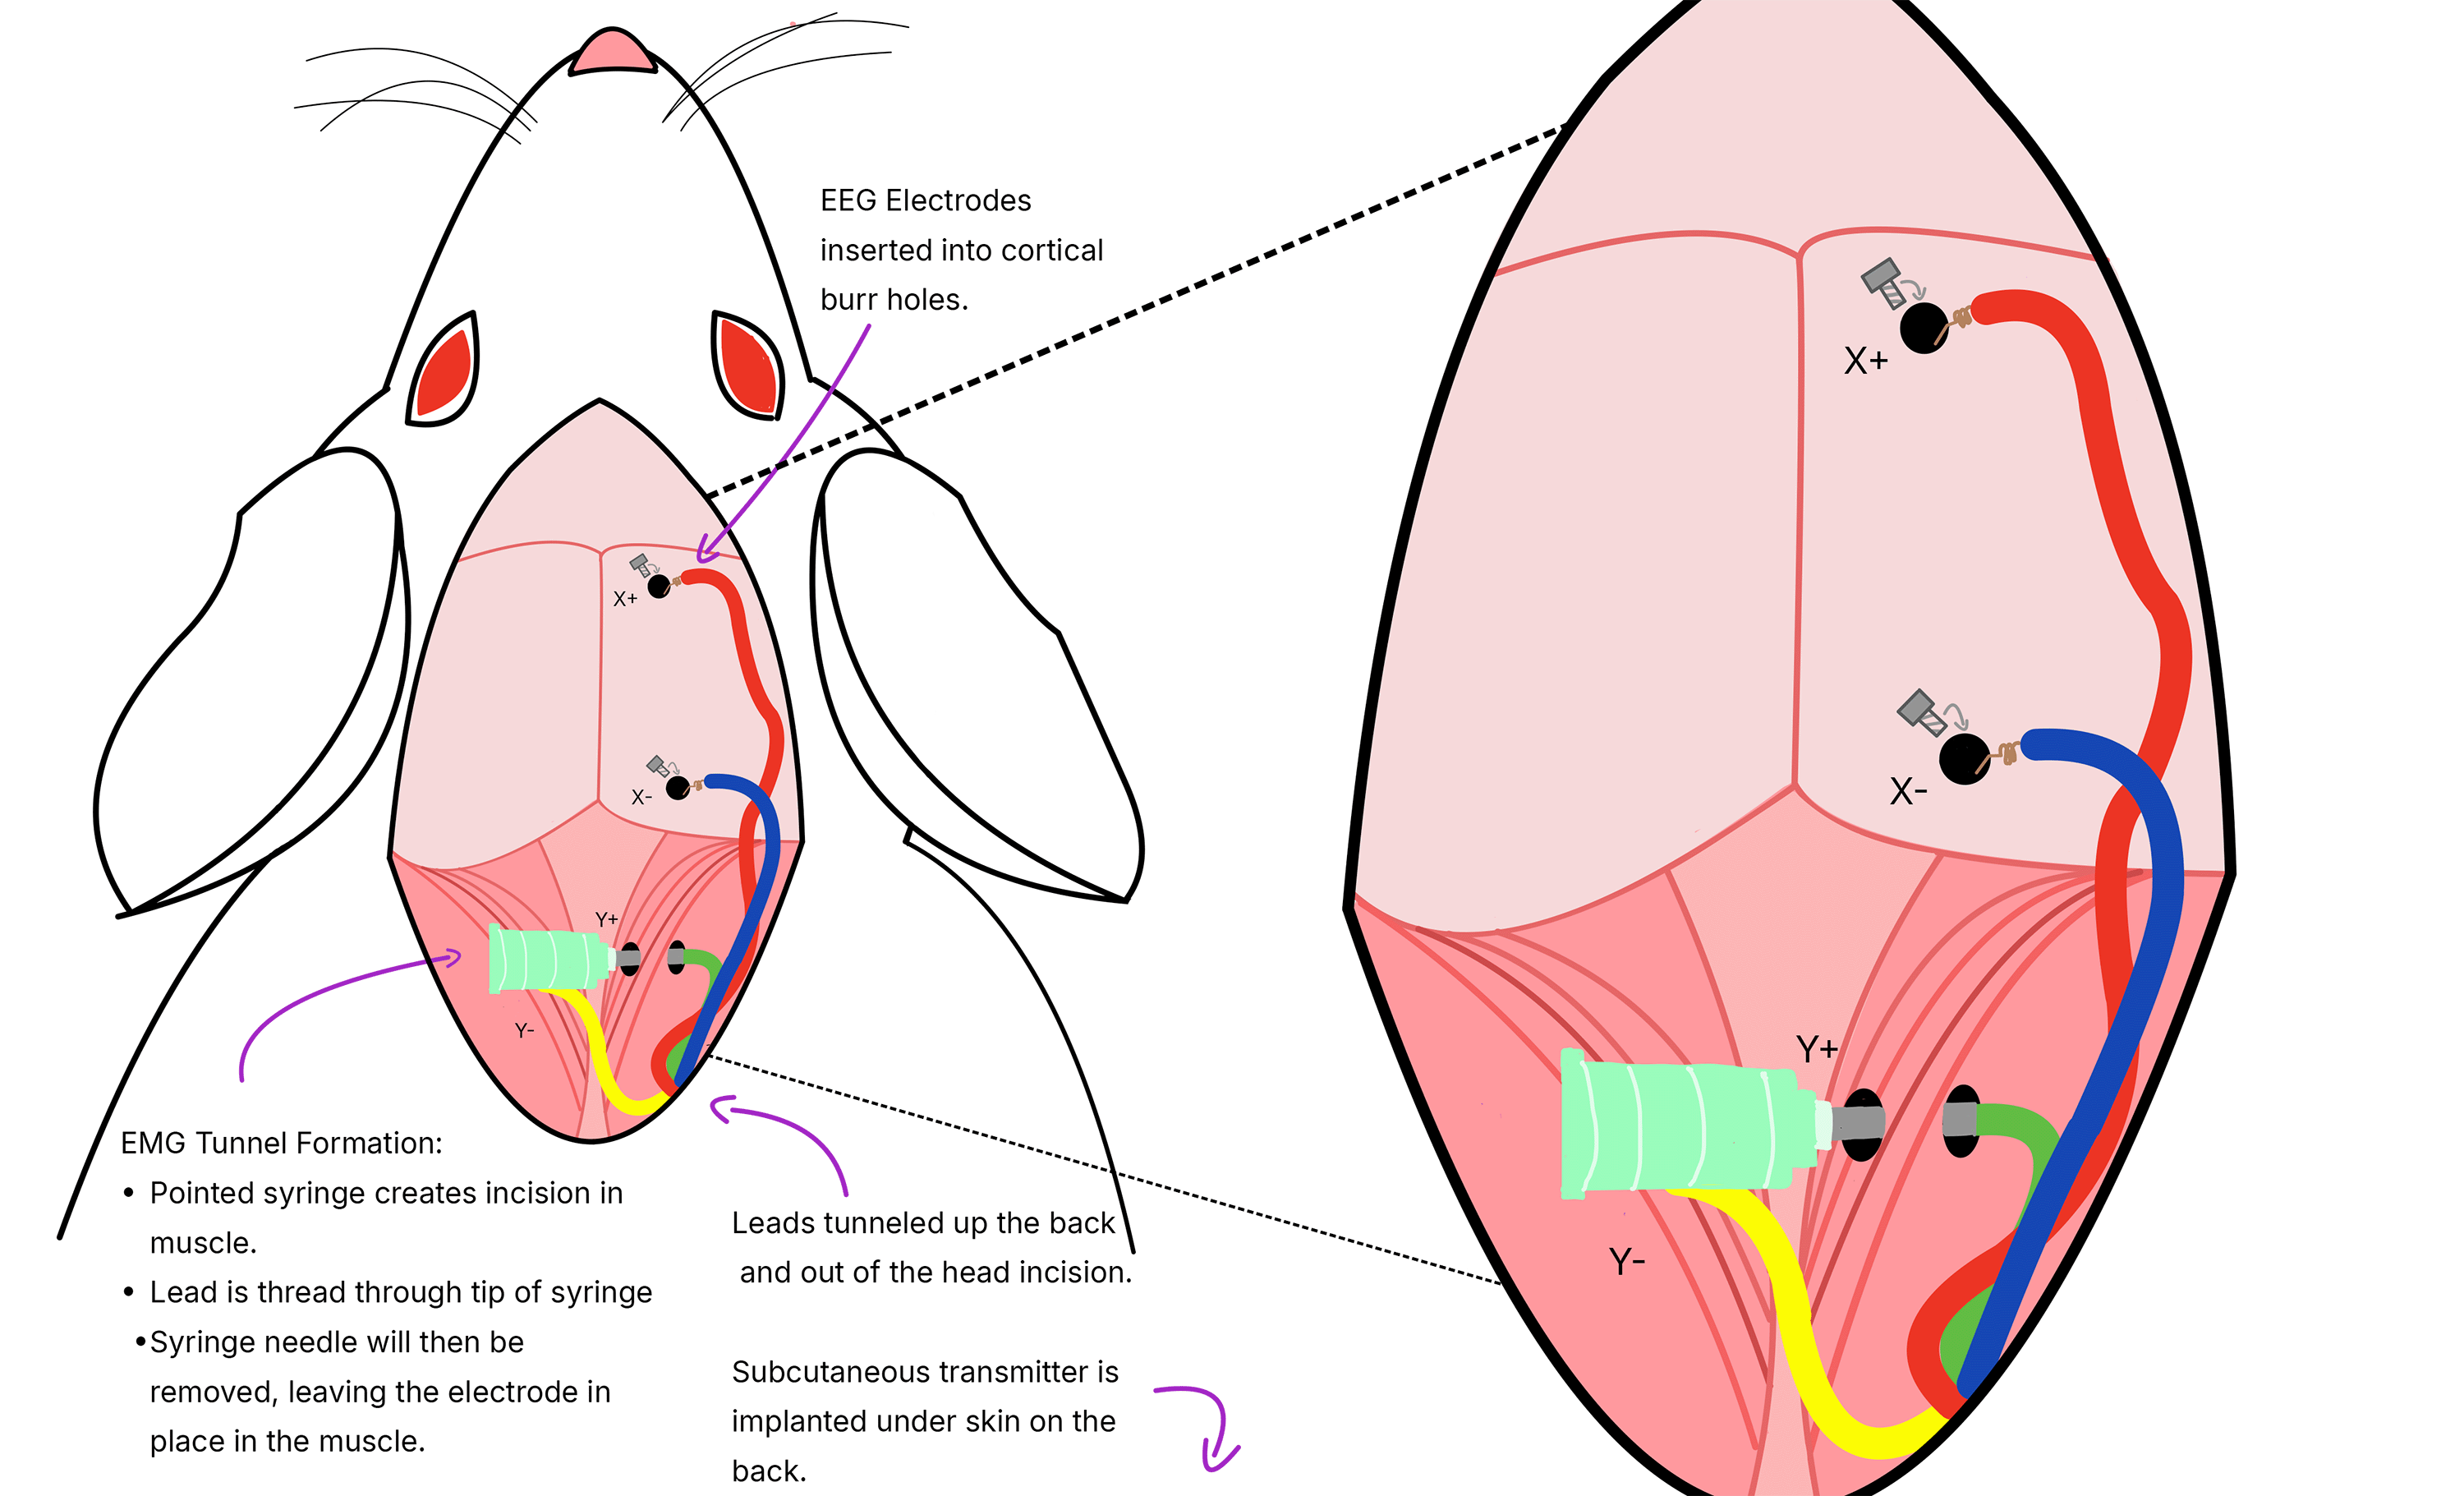