page-chunkmatch-prompts-onlyShow me a surgical procedure for implanting a transmitter in a mouse. What is the protocol for implanting SCTs, ISTs, and BPMs? How do I implant a telemetry sensor in a rat?
Acknowledgement: This protocol is a combination of the protocols provide to us by Luiz Almeida Silva, UCL, and Robert Wykes, UCL. The method for securing EMG electrodes to muscle tissue was described to us by Joel Raymond, PhD, Postdoctoral Research Fellow, Rutgers University.
Disclaimer: Surgical and animal welfare requirements vary across institutions. Consult your institution's veterinary staff to ensure compliance with local guidelines.
Disclaimer: The method we describe for securing EMG electrodes has not yet been validated by our customers.
Introduction
[09-JUN-26] This protocol describes how to implant a Subcutaneous Transmitter (SCT) in rat or a mouse so as to record intracranial electroencephalogram (iEEG) from the brain and electromyogram (EMG) from the muscles in the neck. By "iEEG" we really mean electrocorticogram (ECoG) and local field potential (LFP), which is what our brain surface and brain depth electrodes detect respectively. In this protocol we use as an example for implantation an A3049JS, which is a thin-profile, iEEG and EMG combined transmitter from our A3049 family of SCTs. But we intend for this protocol to act as a basis for devising your own surgery protocol for your own SCT versions. If you are working with a four-channel rat transmitter, you may have eight leads to implant: two for iEEG, two for EMG, two for electrocardiogram (ECG), and two for electrogastrogram (EGG). The ECG electrodes must be secured to the thoracic cavity in the same way that this protocol shows EMG electrodes being secured to muscles in the neck. The EGG electrodes must be secured to the stomach with the same procedure: tunneling with a needle, sliding an S-Coil termination through the tunnel and suturing in one or two places.
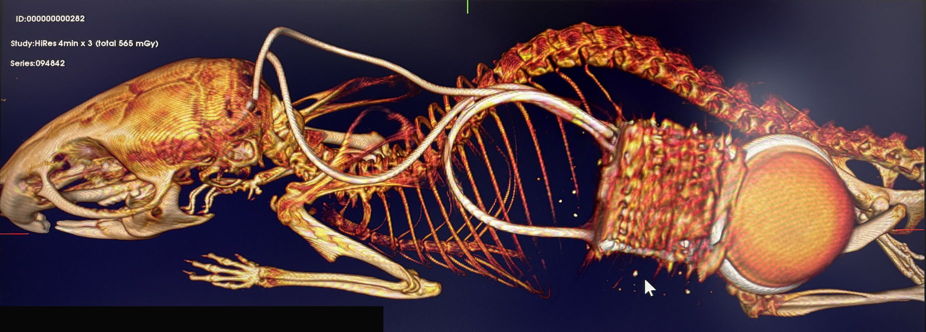
Figure: Implanted SCT, X-Ray Image. An A3048S2 Subcutaneous Transmitter (SCT) implanted by single-incision method. Electrodes fastened to left and right nuchal muscles for EMG recording.
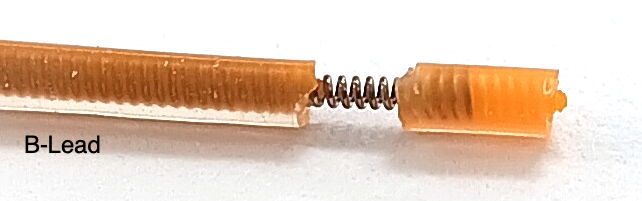
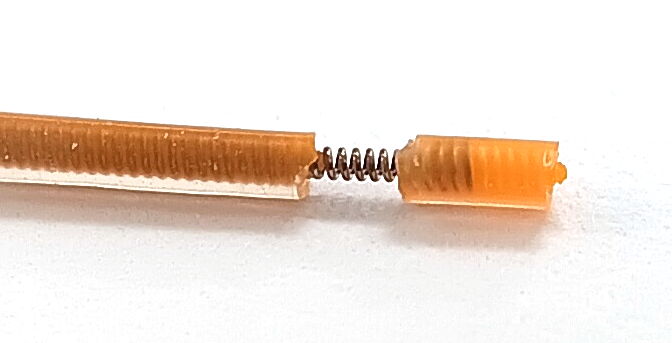
We can equip our SCTs with two types of leads for iEEG and EMG recording. Our "C-Lead" is 0.5 mm in diameter with a 0.25-mm diameter spring inside. Our "B-Lead" is 0.7 mm in diameter, with a 0.45-mm diameter spring inside. The C-Leads are much more flexible, but they can be terminated only with A, P, or S-Coils. The wire in the C-Lead is too fragile for a pin or crimp contact. If you want to deploy depth electrodes on the skull, your iEEG leads must be B-Leads. The B-Leads are tougher, so we recommend you ask for B-Leads if you are implanting in rats.
There are two primary methods for implanting SCTs. In the "Single-Incision Method", we make a single incision in the scalp and use forceps to make a pocket in the neck for the SCT body. The single-incision method is suitable only for slim-profile transmitters implanted in mice. We use the "Two-Incision Method" in all other cases. In the two-incision method, we make one incision in the scalp and another in the back. We implant the SCT over the back and tunnel its leads under the skin to the head. The two-incision method is suitable for thick-profile transmitters in mice and for all implantations in rats.
Materials
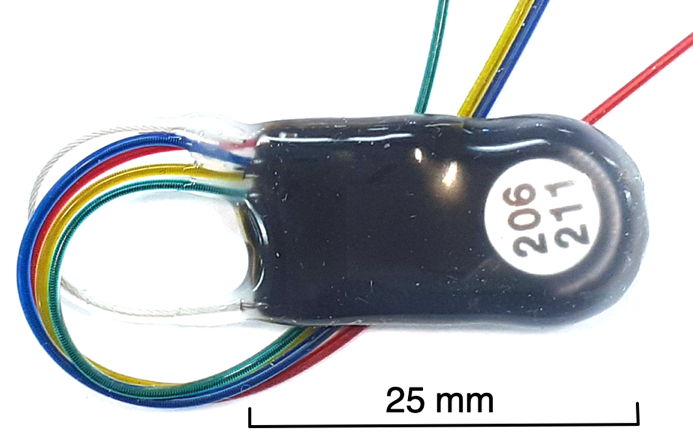
Subcutaneous Transmitter (SCT),
such as A3049JS, from OSI
Red and blue leads with A-Coil termination for brain surface electrodes, from OSI
Yellow and green leads with S-Coil termination for muscle electrodes, from OSI
Screws and depth electrodes as needed for ECoG and LFP, from OSI
Confirm you can turn the SCT on and off with magnet.
Confirm that the SCT can detect AC noise by viewing its signal on your computer.
Confirm that the leads of your SCT are the correct length for the size of your animal, your target recording sites, and your target implantation site.
Ensure the two yellow and green EMG leads have 3 mm of exposed wire coil at the end.
If you need to expose more wire, follow the instructions in Insulation Removal.
Confirm that the EMG coils will fit into your syringe needle. Lead diameter varies by ±0.1 mm. A 19GA needle should fit any C-Lead, but your C-Leads may fit into 21GA. Any B-Lead will fit 18GA, but yours may fit 18GA.
Prepare ECoG surface electrode leads. These have 1 mm of bare steel coil at the end. Hold the lead insulation near the tip with one pair of tweezers. Grab the end of the bare coil with another pair of tweezers. Stretch the coil until it is mostly straight. Make a right-angle bend in the wire 1 mm from the insulation. Trim the end of the lead so its length equals the skull thickness plus your desired cortical depth.
If you have depth eletrodes to attach to your iEEG leads, and you will be implanting using a single incision in the scalp, you may attach the depth electrodes now. Otherwise, do not attach them yet.
Sterilize the SCT and any depth electrodes in ethanol at least five minutes, but no longer than an hour.
Preparation and Anesthesia
Transmitter weight dictates the minimum allowable animal weight. The A3049J2S is a 0.2-80Hz, two-channel transmitter intended for sleep studies. Its mass is 2.6 g. The animals must have mass at least 20 g at the time of implantation in order for us to be confident that the implant will be tolerated.
Weigh the animal and record its weight.
Anesthetize the animal according to your institutional guidelines.
Perform toe-pinch to ensure proper anesthesia depth.
Administer pain medications according to your institutional guidelines.
Shave and disinfect the scalp area.
If implanting in the back, shave and disinfect the back area.
Place the animal on a heating pad or temperature-controlled surgical platform.
Place the animal in a stereotactic stand, connect to anesthetic, and apply eye lubricant.
Disinfect the surgical sites.
Scalp Incision
Using forceps and scissors, lift the scalp and remove an oval section of skin to expose the top of the skull. Avoid the eyes.
If you are implanting for EMG recording, extend the existing incision a few millimeters beyond the skull to expose both trapezius muscles on the neck. You will be implanting one electrode in each muscle.
Clean the skull surface of connective tissue using a bone scraper.
Apply hydrogen peroxide to the skull and immediately dry with cotton swab.
Remove any remaining connective tissue on the skull with bone scraper.
Single-Incision Method
The single-incision method for implanting the SCT body involves inserting the body of the device through the scalp incision and tunneling it down the neck to the back. This method is suitable only for our A3048 SCTs and the slim-profile versions of our A3049 SCTs. These transmitters have side-mounting batteries that give them their slim profile. Because you are inserting the transmitter into a pocket from the skull incision, you can attach any depth electrodes to their leads before you insert the transmitter.
Lift the skin at the back of the scalp incision.
Use forceps to create a tunnel under the skin from the scalp incision to where the transmitter will lay.
To create the tunnel, clear away connective tissue that connects the muscle and the skin. The tunnel should be about as wide as the transmitter you are goint to insert into it.
The tunnel should extend about about half way around the back, into the mid-dorsal region.
Insert the transmitter into the tunnel, guiding it down the spine.
Ensure the transmitter stays centered over the spine to avoid displacement.
Two-Incision Method
The two-incision method of implanting the SCT body involves a second incision in the back, where you we make a pocket to hold the body of the device. You will tunnel the leads under the animal's skin from this pocket to the incision on the scalp. If you are deploying a depth electrode for the red lead on the skull, you will attach it to the end of the red leads after you pull all the leads to the skull incision.
Use tweezers to pinch and cut skin of mid-dorsal region, half way down the back. Incision must be large enough for the transmitter to fit into.
Make a pocket for the transmitter to sit in. Clear connective tissue between skin and muscle where transmitter should lay.
There are different schools of thought on where the transmitter should lay. We want to avoid the transmitter directly settling on the spine. We also do not want it to fall to the front of the animal, or else the animal will be able to claw the transmitter out through its own skin.
The pocket should be just large enough to accommodate the transmitter. A snug pocket will hold the transmitter in place.
Create a tunnel for the leads to pass from the transmitter pocket to the scalp incision.
To prevent irritation in the animals neck, make the tunnel along the back of the animal, up until the neck, and then bring the tunnel around the side of the neck rather than directly over the spine, so that the tunnel arrives at the scalp incision at an angle to the spine.
Place transmitter in the pocket you created under the skin in the back.
Feed electrode leads up the back tunnel and pull through the scalp incision with tweezers.
Make sure the leads are out of the way when drilling through the skull in the next steps
Burr Hole Drilling
Glue the skin of the scalp in place with Vetbond to prevent bleeding and keep skin retracted for surgery.
Zero the stereotactic stand using the bregma as your reference.
Using your stereotactic stand, locate the desired burr hole coordinates and mark them on the skull with a sterilized marker.
Drill burr holes at marked positions. Drill down until a thin layer of bone remains to cover the dura. Use a sterile syringe needle or sharp-pointed tweezers to poke through the remaining bone to the dura.
If you are going to anchor bare-wire electrode in these holes, confirm the screws fit in the burr holes.
Dab excess fluid with sterile cotton.
iEEG Implantation
If you made an incision in the back for your transmitter, and you are going to deploy a depth electrode for the red iEEG lead, prepare and connct the depth electrode to the red lead now, before you inserting the electrode into the brain. See our Electrode Implantation Protocol for detailed descriptions of connection and insertion methods for our various depth electrodes.
Insert surface electrodes into burr-holes first. You may be deploying both the red and blue leads as surface electrodes, in which case, prepare the bare wire end and fasten in place with a screw, as we describe in our separate Electrode Implantation Protocol.
Insert depth electrodes. In this example protocol, we have only one iEEG recording channel. Most likely you will chose to put the blue lead over the cerabellum with a surface electrode, and the red lead will receive the depth electrode. Fasten the depth electrode into the stereotactic clamp and maneuver it into position, as we describe in our separate Electrode Implantation Protocol.
If bleeding occurs, dab with a cotton-tipped applicator.
Apply cyanoacrylate around the burrholes to prepare them for dental cement.
Make sure no cyanoacrylate penetrates the burr hole of a surface electrode, or else the cyanoacrylate might form an insulating layer over the electrode wire.
Move excess leads back into the tunnel over the neck. If you have made a back incision, you can pull them from there. If you are using only the scalp incision, you must push them down the tunnel you made for the transmitter. The length of lead exposed over the scalp should be as short as possible.
Leave slack in the leads under the skin. If the leads are pulled too tight between the trasnmitter and the electrodes, they can irritate the animal, dislodge the electrodes, or drag the transmitter body towards the head.
Secure the leads where they exit the scalp incision with cyanoacrylate.
EMG Implantation
If we are implanting to record EMG, we place the first of two EMG electrodes in one of the trapezius muscles. For EMG recording, we use our soft tissue electrode, which we make out of an S-Coil termination. This termination can be provided on the end of a 0.7-mm diameter B-Lead or a 0.5-mm diameter C-Lead. The B-Lead S-Coil provides slightly more bare wire and slightly more tip insulation than the C-Lead S-Coil, making the B-Lead version more suitable for applying a second suture to the electrode at the end of the procedure. In this examle, we begin by placing the one EMG lead in the left trapezius muscle. But we can record biopotentials from any region of the animal using soft tissue electrodes.
Figure: Insertion of EMG Leads Into the Trapezius Muscle.
Extend the existing incision a few millimeters beyond the skull to expose the trapezius muscles on the neck.
Expose both trapezius muscles. You will be implanting one electrode in each.
Identify the top of the two trapezius muscles and locate the midline between them.
There will be two EMG leads. In our diagram they are green and purple. You will implant each in a separate trapezius muscle.
Insert the needle on the side of the neck opposite the natural location of the electrode lead.
The needle should create both an entrance into and an exit from the muscle.
The tunnel should be roughly 2 mm long and penetrate 1 mm into the tissue at its deepest point.
Control bleeding with sterile cotton and leave the needle in place.
With the needle still in the muscle, insert the S-Coil at the end of the purple EMG lead into the needle tip.
Figure: Securing the EMG leads to the Trapezius Muscle. We record EMG with a soft tissue electrode.
Remove the needle while holding the wire in position with tweezers.
Once you have removed the needle, you should see 1 mm of bare steel coil protruding from the muscle on the far side of the tunnel.
Keep the wire in position. Secure the lead in place with a single suture near the entry point.
The suture must wrap around the insulation of the lead, not the bare steel coil at the end of the lead.
Try to leave no bare steel coil exposed at the entry point.
If desired, suture the insulated tip of the lead as well. This is more practical with the B-Lead S-Coil.
Now that you have the first EMG electrode placed and imlanted, repeat the placement and securing procedures for the second EMG electrode in the right-side trapezius muscle.
Cementing and Closing
There are two schools of thought when it comes to closing the scalp incision. One is to suture the scalp over the electrodes we have implanted on the skull. The other is to glue the edges of the incision to the skull with cyanoacrylate and fill the opening in the scalp with dental cement. Here we describe the most widely-used of these procedures, the one that works just as well with depth and surface electrodes: the construction of a dental cement dome. If you are deploying only surface electrodes, however, you can consider keeping the thickness of your insulating dental cement to a minimum and suturing the scalp. Once the scalp incision heals, the result is long-lasting and more natural to look upon.
If you have implanted EMG electrodes, close the incision over the trapezius muscles and suture the skin all the way up to the base of the skull, but no farther.
Secure burr holes and depth electrodes in place with a dental cement and allow to cure.
Clip protruding depth electrode posts at designed breakpoints.
Cover over all exposed areas, all exposed metal, and all leads with more cement.
Minimize the amount of contact between the dental cement and the animal's fur and skin.
The top of the dental cement may remain a bit tacky. Cover it with more dental cement.
Allow cement to cure and trim excess with a scalpel or scissors.
Seal the cement-skin interface with cyanoacrylate.
Do not allow cyanoacrylate to touch the animals eyes, nor to flow onto its fur.
If you used the single-incision method, you are are now closed up and done with surgery. If you used the two-incision method, you still have the back incision to close.
Close the back incision with sutures.
The SCT leads may be coiled near the transmitter body, so take care not to caught and bind them with your sutures.
The transmitter should be sitting in a pocket to one side of the incision, not directly beneath the sutures.
Post-Surgical Care
Allow several days of recovery in a clean, quiet environment.
Monitor daily for pain, disstress, weight loss, and infectionl.
If the dental cement cap on the head becomes displaced, or if electrodes wires are exposed, consult your vet.
Notes and Best Practices
When re-using an SCT, make a clean cut and strip the silicone at the end of the leads.
Do not fill bur holes with cyanoacrylate, doing so affects brain and electrode surfaces.
If you notice the animal is not grooming the skin above the transmitter, or the skin seems thin or stiff, pick up the animal and move the transmitter around beneath the skin with your fingers to detach it from the skin. The transmitter has been adhering to the underside of the skin. Apply sudocream to the affected area afterwards.
Our customers report that our slim-profile SCTs never adhere to the skin of the animal.
You can and should co-house animals equipped with Subcutaneous Transmitter implants, but we advise letting the animals heal on their own for a few days before co-housing.
 Subcutaneous Transmitter Surgical Protocol
